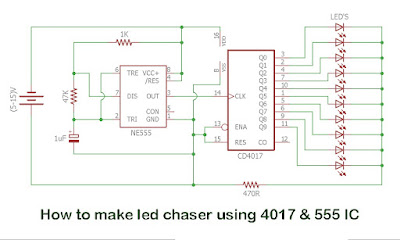
So Hey Guys in today's article. I am going to teach you how to make an LED chaser lights (or) sequential LED flasher circuit on a PCB using 555 timer + 4017 IC and a few other components. The LED's chasing rate can be adjusted using a potentiometer in place of 47K resistor. Watch the video above for detailed step by step instructions on how to build this circuit. Explanation of how the circuit works is also included in the video.
Circuit Digram:
Components Required:
- 555 Timer IC
- CD 4017 IC
- LED Lights x10
- Resistors: 470R, 1K, 47K
- Capacitor: 1uF
- Power Supply: (5-15)V
Before understanding how the circuit works, let me tell you that I am using custom-made PCB to make this circuit. This project is sponsored and supported by JLCPCB
I am giving you the GERBER file so you can download and use it for free. For PCB orders you can use JLCPCB You can order your custom-made PCB From JLCPCB If you are a new user register on the website through our link: https://jlcpcb.com/IUP and you can get a $54 new user coupon code that you can use in your first order shipment and SMT service. I would definitely say to use this coupon code.
Visit JLCPCB Website.
$2 for 5pcs PCBs,PCBA from $0,Register to Get Coupons Here: https://jlcpcb.com/IUP
🔹Circuit Diagram -: https://www.diyelectronic.in/ how to make led chaser
This beating yield from the 555 clock is associated with the clock contribution of 4017 IC (a decade counter). It has 10 output pins and we have associated a Prompted each output. Of course, the primary result pin is on/high and the rest are off. Each time the clock input pin of 4017 IC recognizes an ascent in voltage (from low to high), it switches off the ongoing output and turns on the following successive output. This swapping of outputs which looks like the LED's are chasing each other, continues until the last LED and then the output resets back to the first LED.
For this LED chaser circuit, we have used all the 10 outputs of 4017 IC. But if you wish to make an LED chaser circuit with less than 10 LED's, you can do the same by connecting the LED's starting from U0. Let's say you wish to build this circuit with 4 LED's, you need to connect an LED to each of U0, U1, U2, U3 and leave the rest
Visit JLCPCB Website.
$2 for 5pcs PCBs,PCBA from $0,Register to Get Coupons Here: https://jlcpcb.com/IUP
🔹Circuit Diagram -: https://www.diyelectronic.in/ how to make led chaser
Clarification of Circuit's Working:
The 555 clock IC is arranged to work in astable mode. And that implies, the result from the 555 clock changes ceaselessly between high (Supply Voltage) and low (0V). As such, in the event that you interface a Drove between the result of 555 clock and ground, the Drove streaks/flickers ceaselessly.
This beating yield from the 555 clock is associated with the clock contribution of 4017 IC (a decade counter). It has 10 output pins and we have associated a Prompted each output. Of course, the primary result pin is on/high and the rest are off. Each time the clock input pin of 4017 IC recognizes an ascent in voltage (from low to high), it switches off the ongoing output and turns on the following successive output. This swapping of outputs which looks like the LED's are chasing each other, continues until the last LED and then the output resets back to the first LED.
For this LED chaser circuit, we have used all the 10 outputs of 4017 IC. But if you wish to make an LED chaser circuit with less than 10 LED's, you can do the same by connecting the LED's starting from U0. Let's say you wish to build this circuit with 4 LED's, you need to connect an LED to each of U0, U1, U2, U3 and leave the rest
Hope the article helped you.
Don't Forget To Watch This Video 😉
Don't Forget To Watch This Video 😉

.gif)
Post a Comment
Post a Comment