Lithium ion or LiPo batteries are very popular, especially with makers like.
These batteries are also very sensible and dangerous. If you don’t control the process of charging of such batteries, they will stop working or worse. The battery can swell and even explode from overcharging, and a deep discharge can make the battery fail.
Components Required:
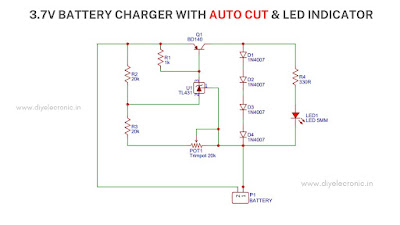
We have a PNP transistor connected in series with 4 diodes that will simulate a load. At the base of the transistor, we have a Zener reference diode (TL431) which will get open at a certain voltage value and by that connects ground to the transistors base and when the transistor is active, we bypass the battery and waste the power on the diodes instead. This ZENER diode is the TL431 and it has a reference pin, so by adjusting the potentiometer we can set this reference to be at 4.2V, that’s how we select when the charging process will stop.Before understanding how the circuit works, let me tell you that I am using custom-made PCB to make this circuit. This project is sponsored and supported by JLCPCB
I am giving you the GERBER file so you can download and use it for free. For PCB orders you can use JLCPCB You can order your custom-made PCB From JLCPCB If you are a new user register on the website through our link: https://jlcpcb.com/IUP and you can get a $54 new user coupon code that you can use in your first order shipment and SMT service. I would definitely say to use this coupon code.
Visit JLCPCB Website.
$2 for 5pcs PCBs,PCBA from $0,Register to Get Coupons Here: https://jlcpcb.com/IUP
Visit JLCPCB Website.
$2 for 5pcs PCBs,PCBA from $0,Register to Get Coupons Here: https://jlcpcb.com/IUP
How it's work?
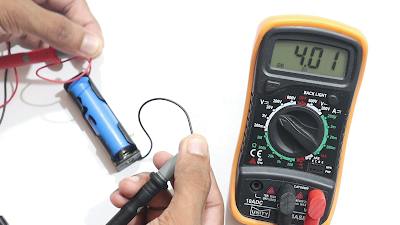
I supply it with 4.2V from my power supply. I connect my multimeter at the output and using the potentiometer, we first fix the threshold value to around 4.2V, I will use a battery which is discharged and below 3.90V When I connect it to the charger, the LED is turned off. Now the battery is getting charged up. After some time, when we get above 4.2V the LED will turn ON so the charging process is complete. Current is now flowing through the diodes and transistor and we skip the battery, so the cell is protected for over voltage.I measure battery and it is 4.1 volts.
🔹Gerber File -: https://drive.google.com/Gerber-File
🔹Circuit Diagram -: https://drive.google.com/file/Circuit
🔹Circuit Diagram -: https://drive.google.com/file/Circuit
Hope the article helped you.
Don't Forget To Watch This Video 😉
Don't Forget To Watch This Video 😉


.gif)

1 Comments
The schematic is missing the input terminal
ReplyDeletePost a Comment